[2402172028+10]
in case i'm too lazy to explain my processes
full video process
kinda like amvs, films, and stuff.just going over my process from storyboard/planning to finishing to post processing.used sho's bday vid as an example loolll
sorry sho
storyboarding / animatic
ㅤㅤㅤㅤthere's differences between an animatic and storyboard but fundamentally they do they same thing; help you plan out your video.ㅤㅤㅤㅤwhat's important while planning is indicating movement, whether that be for character, scenery, or camera. you need to know what parts you'll actually be animating to move, or what parts you'll pan during post-processing.

ㅤㅤㅤㅤthis is a storyboard since it's a collection of images rather than a draft video synced to audio. camera movement and notes are indicated in a separate colour to see easier and to separate from the actual video.
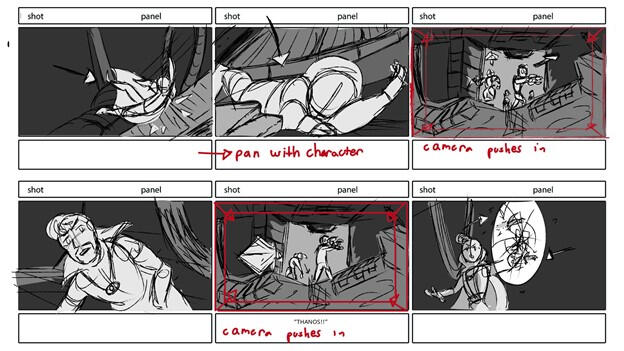
ㅤㅤㅤㅤthe point of this stage is to get an idea of wtf you're actually going to do. some people don't need colour to separate the background from the focus, others (me lol) do. all the power to the creator. but if you're working on this collaboratively, it's beneficial to have some sort of colour indicator.ㅤㅤㅤㅤif you do end up using colour here, it's easier on yourself if you use very little during this phase. i recommend using greyscale.
ㅤㅤㅤㅤusing different values of grey can help indicate foreground from middleground from background, or show the source of light, or to show the focal point. plenty of uses.
ㅤㅤㅤㅤ[all of this just comes from a greyscale favouritism artist wkwk]
ㅤㅤㅤㅤusing colour also works to separate characters from one another if there are multiple in your scene. kinda like telling the characters apart in a crowd.everyone works differently. find whatever works for you.important to note: stray away from animating frame by frame here.
ㅤㅤㅤㅤa storyboard/animatic is for planning your separate scenes. it's a wasted effort to animate here. just plan your character's positions and movements as still images.
ㅤㅤㅤㅤ
ㅤㅤㅤㅤTLDR:
- storyboards separate and plan out scenes and movement
- easier to use greyscale
ㅤㅤ- separates fore/middle/background
ㅤㅤ- easy show of focus
ㅤㅤ- show direction of light
ㅤㅤㅤㅤ
ㅤㅤㅤㅤ
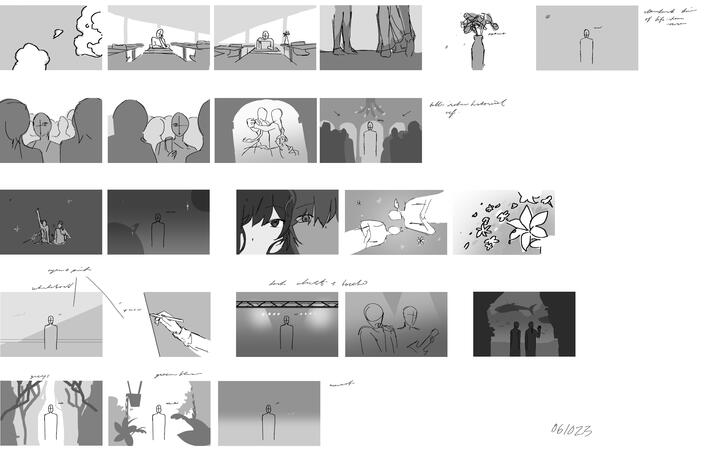
here's my animatic.ㅤㅤㅤㅤvery evidently, a LOT changed in the final, mainly cus of time crunch. but yeah, you only see major scene changes and things i wanted to sync with the music (like the blinking). no use animating in this stage cus literally no one would've seen it.ㅤㅤㅤㅤif you look on youtube you'll find plenty of different ways people plan and draft out their story. find what works for yew ok it's rlly not allat.
colour key
you've got your storyboard, what now? since you've planned out your scenes, now you gotta plan colours.ㅤㅤㅤㅤa colour key is just your storyboard palette that you'll refer back to while colouring. you'd determine the mood of the scene and the video's overarching vibe here.

ㅤㅤㅤㅤstoryboard before i slapped colours on it. since this video cut a lot between au's and different settings, i grouped the scenes by setting.

ㅤㅤㅤㅤstoryboard after i slapped colours on it!! i can see what scenes will have a certain colour scheme since they're all grouped together. and since they're lumped like this, i can see which ones stick out like a sore thumb and what vibe i'm getting.
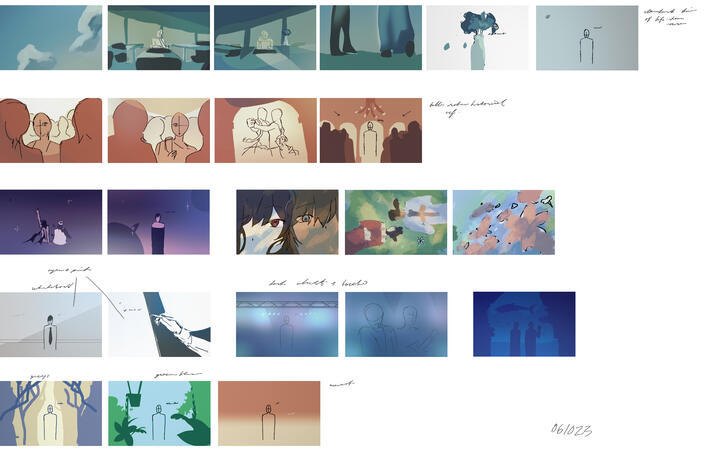
ㅤㅤㅤㅤif you switch settings between scenes a lot, it's good to give them their respective colour palettes to give the viewer a clear indication the location changed.you don't even need to give a colour key to every scene!! block out the colours from one scene of that setting and you'll be able to refer to it everytime you colour something within the same setting.
animation
ㅤㅤㅤㅤPUKED! i hate animation. i'll prob go overz it in more detail in csp animation if i ever get around to it since icba to do it here.. lmk if you urgently need to know how to animate??.??ㅤㅤㅤㅤahemm you'll have to animate everything by scene and save them separately instead of working on the whole video in one sitting.KEYFRAMES - map out your major movements
BETWEENS - add most things between the major movements
COLOUR - colour dat on a separate layer
CLEANUP - tbh i don't give two shits abt this but clean it up if you need toboom. animation. but gotta go over some things ;;;LINEART:
ㅤㅤㅤㅤit'll be really good to use an antialiasing brush for lineart. this makes colouring way easier, since that little blur around lines will make filling super annoying.
ㅤㅤㅤㅤif you're using after effects to composite, you can smoothen this pixellyness with a plugin and it'll turn it into an aliasing brush like a standard gpen. this is actually the usual routine for things like anime where they gotta work w a time crunch and shitty working conditions LOL i mean yeaLAYERS:
ㅤㅤㅤㅤif you have a foreground/background planned, keep it separate! do not save it with your animation!!! you'll put this with your animation during compositing, since that's when we'll be doing all the cool special effects and junk.
ㅤㅤㅤㅤwhile i didn't really do this in my sho video, it's preetty good to save your lineart and your colours as separate videos. reason being, you can add multiply/overlay/shadows/highlights during compositing!! this may not work if you have a painterly style, but for cell shaders, you can use plenty of effects in your editing software to mimic a highlight and save time.
ㅤㅤㅤㅤif you want to be super extra, you can even animate the shade of your character and turn that layer into a multiply effects layer in compositing. more power to you.
ㅤㅤㅤㅤhere's a rundown of what your layers could look like if you decided to save everything separately:- foreground
- animation
ㅤㅤ- lineart
ㅤㅤ- highlights (cell shading)
ㅤㅤ- multiply (cell shading)
ㅤㅤ- base colour
- backgroundyou don't have to save everything in the animation separately if you don't want to. it ate away at my storage when i did wkkwkw;; but yea you can save your animation layer as combined or separated as you want. it's just helpful to separate your foreground and background.

ㅤㅤㅤㅤparts broken down. some parts are used to simulate a panning camera affect (foreground/background) and some parts get turned into overlay layers in post-process (glowing orange). you can use base colours here since shading and stuff can be done later